
Railway company
💡Thanks to its flexibility, Timezynk is an excellent choice for companies in a variety of industries, such as healthcare, recruitment, consulting and management services, hospitality, and real estate.
While some companies do very well with Timezynk's default settings, there are also businesses that need to customize the system to meet their specific needs.
Below is a description of how railway companies can adjust their settings to achieve the best possible results.
Settings for a railway company
The majority of companies in the railway industry choose not to schedule. Instead, their employees create independent time reports after completing their work shifts.
The image below illustrates the structure of how such a report might look.
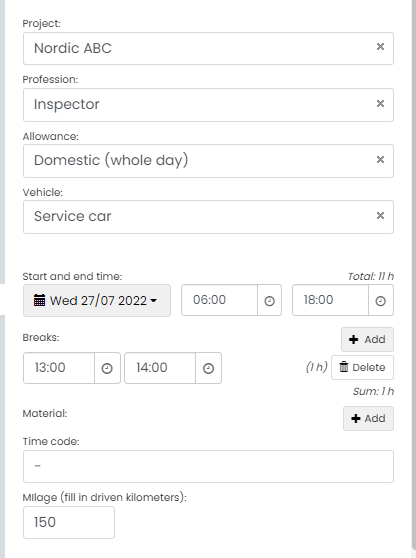
💡The fields are used to collect valuable information about your employee's workday and to ensure that both billing and payroll management operate smoothly, without unnecessary discrepancies.
👀Do you want your account to have a similar structure? Below you will find a clear and detailed instruction on how to proceed.
Create new registers
- Go to Register settings (⚙️ > Settings > Register settings).
- Click on the green button + Add in the upper right corner.
- In the field Title, type Project.
- Click the button + Create in the lower left corner of the Create a register box.
- Repeat steps 2–4 for the registers Occupation, Compensation, and Vehicle.
Add additional fields to the Project register
- Under Register settings, click on the register named Project.
- Click on the button + Add at the bottom of the page.
- In the field Type, select Project Code under Invoice Line.
- In the field Name, type Project Number (invoice).
- Click the button Save in the lower left corner of the box.
- Repeat steps 2–5 with the following:
- A field of type Project Number under Salary Line.
- A field of type Customer under Register.
Connect registers to your shifts
- Click on SETTINGS/REGISTER in the upper left corner to return to Register settings.
- Click on the register named Shift.
- Click on + Add at the bottom of the page.
- In the field Type, select Project under Register (you may need to refresh the page to see the new registers).
- Click the button Save in the lower left corner of the + Add field box.
- Press the 6 small dots on the left side of the field and drag it below the field Grid.
- Repeat steps 3–6 for the registers Occupation, Compensation, and Vehicle.
Customize registers for time reports
- Click on SETTINGS/REGISTER in the upper left corner to return to Register settings.
- Click on the register named Time Reports.
- Click on the button + Add at the bottom of the page.
- In the field Type, select Numeric under General.
- In the field Name, you may type Miles (indicate the number of miles driven).
- Click the button Save.
Activate registers for materials
- You will need assistance from us for this. Contact our support via support@timezynk.com.